Your shopping cart is empty!
|
|

What is a diamond mosaic?
Complete overview: types, special features, an instruction for use.
General information
A diamond mosaic is a new fascinating craft. It is also referred to as the diamond embroidery, rhinestone painting and diamond painting. It does not change the essence of the process, and the result is always great: fabulous three-dimensional designs, which can add a bit of pizazz to your décor or can be presented to friends and family. So, what is a diamond mosaic?
It is generally believed that the mosaic as such appeared as far back as in the Ancient Babylon, and the very first works were laid out on fabric with genuine precious stones. The ancestors of the mosaic are ancient stained-glass windows and bohemian glass.
A modern variant of the diamond mosaic has appeared in China, which involves laying out a design with acrylic rhinestones. Such designs preserve the main features of authentic mosaics: shine and volume, and allow nobody to stay indifferent. Put simply, the diamond mosaic is the laying out of colorful designs with rhinestones following a strictly defined chart, and the process itself resembles the mosaic. Rhinestones are of equal size, and you are simply laying them out closely to each other as per a definite template. A finished design is bright, and it will never lose color in the course of time.
The diamond mosaic is a gorgeous work for stress release, relaxation and meditation. The process also develops motility and diligence. In the process of laying out you will see as the picture literally comes to life and starts sparkling and shining.
And what is more important, the result is guaranteed as making a mistake or ruining anything is simply impossible.
It is not so difficult to learn to lay out diamond mosaic designs. And if you are already familiar with traditional stitch craft or paint-by-numbers, you will master such technique in less than no time. All you need is your desire and positive mood, all the rest is available in the PICASSO kit!
The PICASSO diamond mosaic kit consists of 2 main elements:
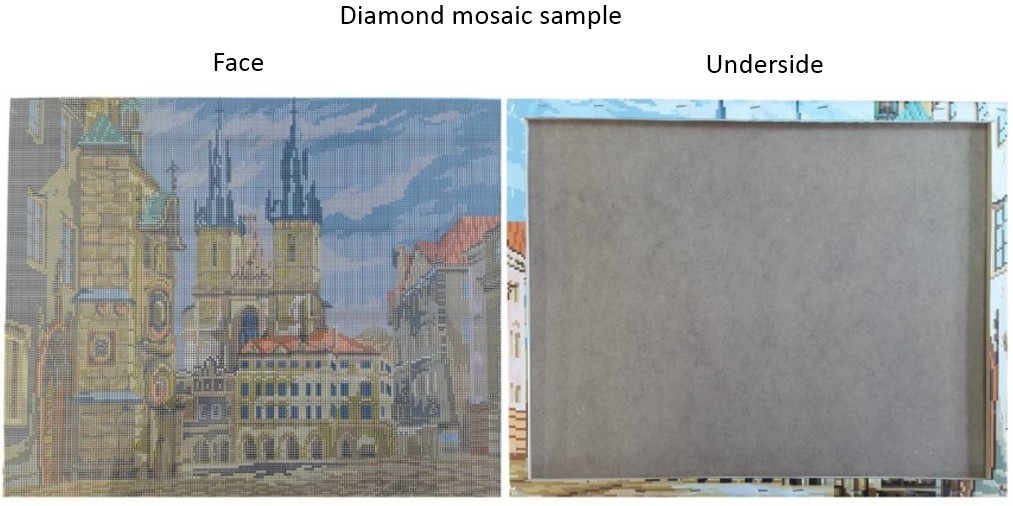
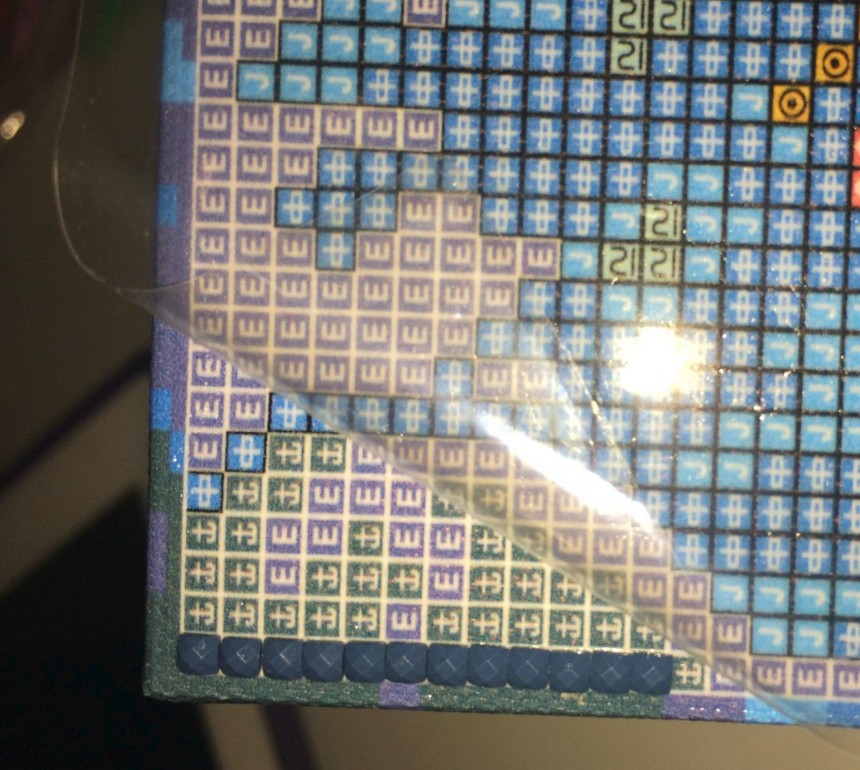
1) A canvas is a dense fabric cloth and divided into a lot of square segments.
A designation is stamped (painted) inside each segment.
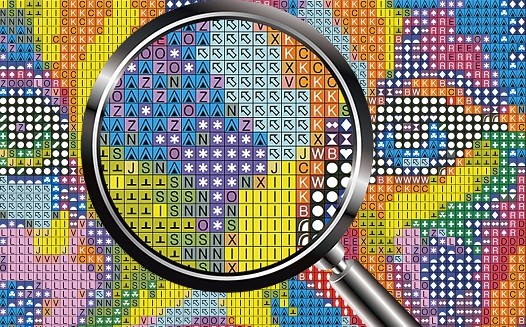
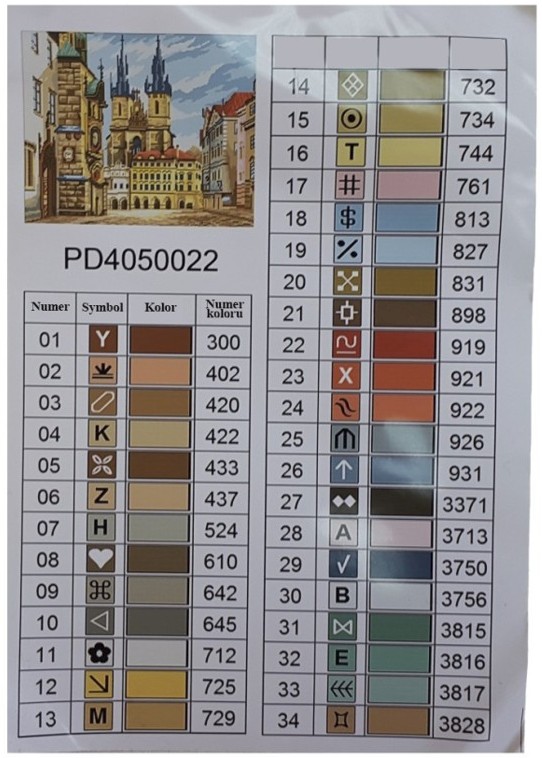
Compared to paint-by-numbers, where segments are labeled with numbers, in the diamond embroidery figures on the fabric are replaced by simple symbols: due to it the chart is easy-to-follow. Each symbol on the fabric corresponds to a certain rhinestone number in the kit, which is to be stuck on this segment. The set is completed with a special chart-legend, which determines to what designation on the canvas one or another rhinestone number refers to. A color number is indicated on a rhinestone package, and a symbol – on the chart.
The surface of the canvas is fully coated with the special-purpose adhesive composition protected with a transparent film. An adhesive coating on the canvas is necessary to fix rhinestones on the canvas, and a protective film prevents from early adhesive drying out.
Each time you are working at your project you need to peel back a piece of the protective film from the canvas and apply rhinestones on an open area in accordance with a color chart.
By peeling back the protective film gradually, you release new open areas of the canvas for rhinestones laying out and move beyond until all the canvas segments are filled with rhinestones, which results in a gorgeous bright design at the end of the process.
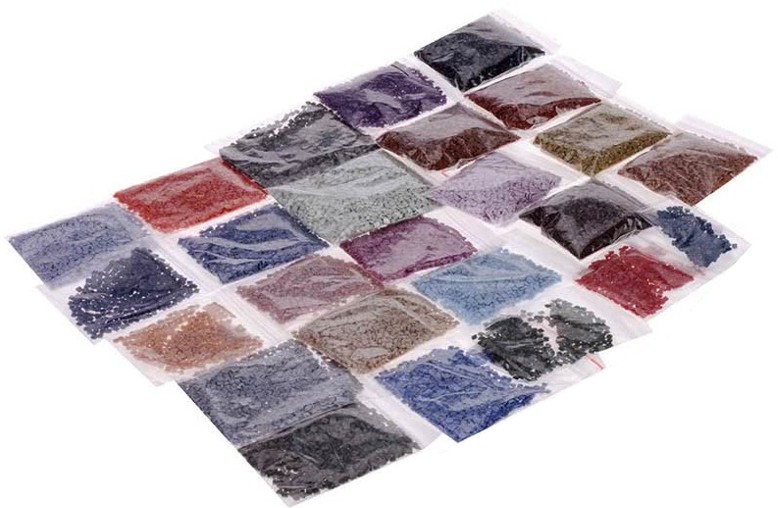
2. Rhinestones are small acrylic square crystals of 2.5 mm. The rhinestones look bright, eye-catching and very unusual, they spectacularly refract light and produce a stunning shimmery effect. The rhinestones are packaged by colors in small plastic zip-lock packages, each having a numerical order.
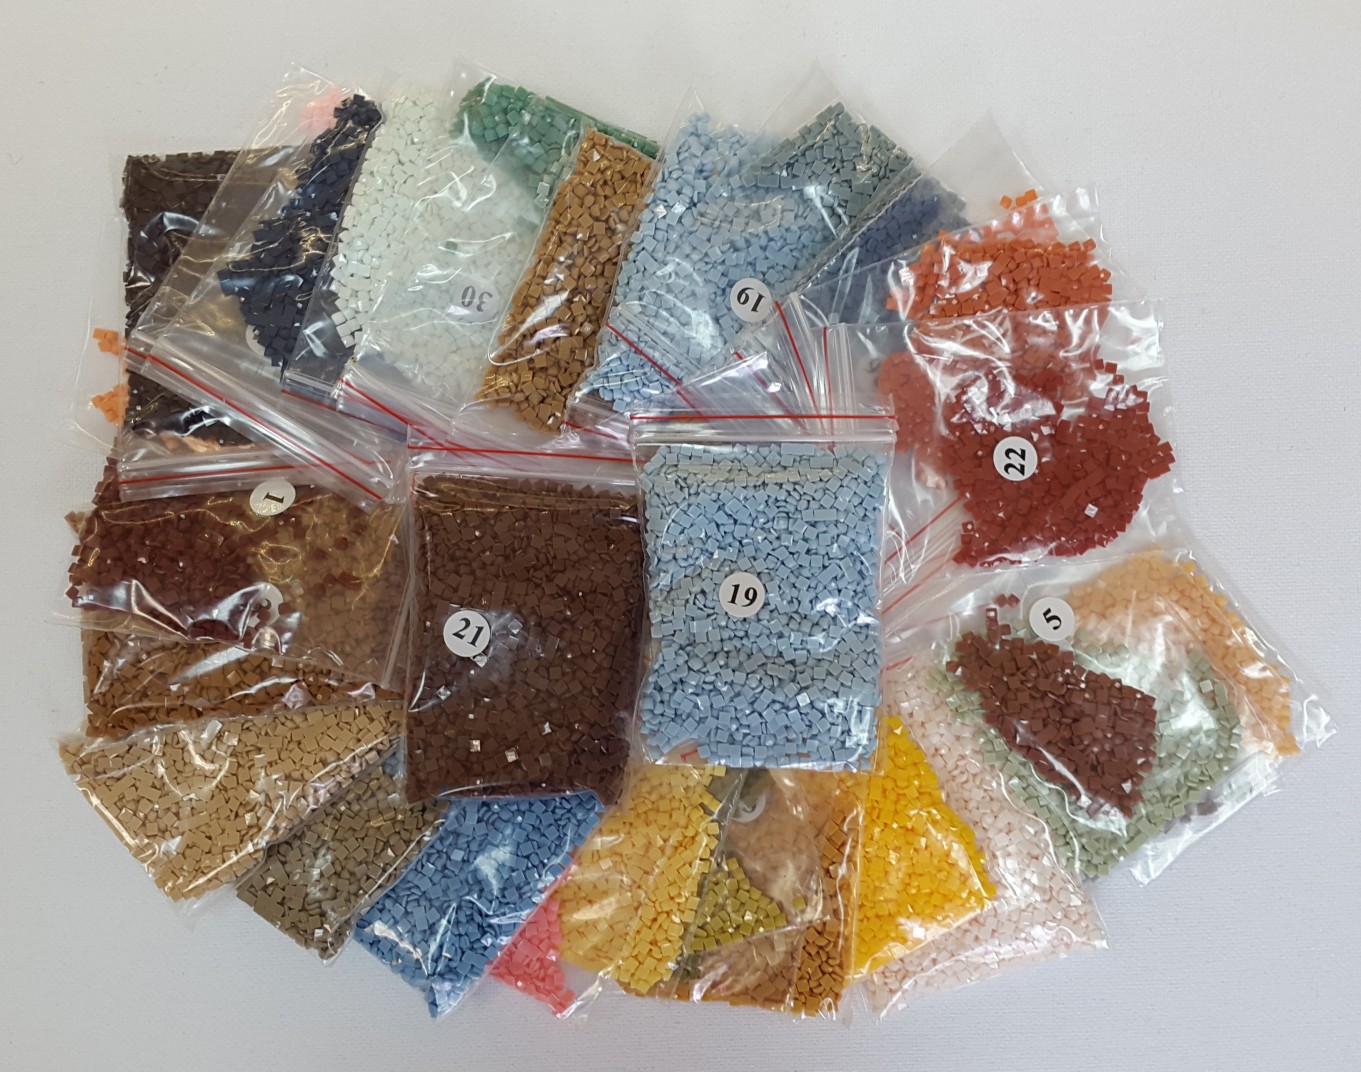
If you get a good look at the rhinestones, you can see, that they have diamond-like facets, that is why such designs are called ‘the diamond mosaic’. The feature is that the rhinestones of one and the same color have different faceting (different direction of facets).
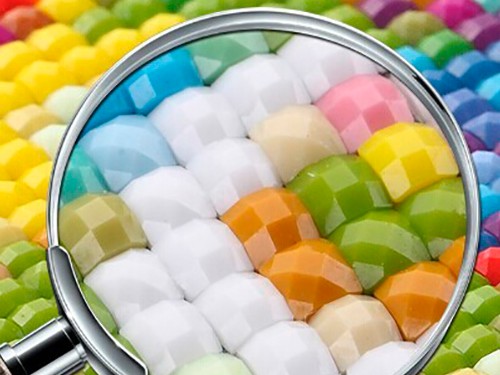
Such facets refract light in a different way, which adds volume and shine to the design: rhinestones do not look like laid out with a rule, and the alternation of facets in rhinestones of one and the same color make the design more vivid.
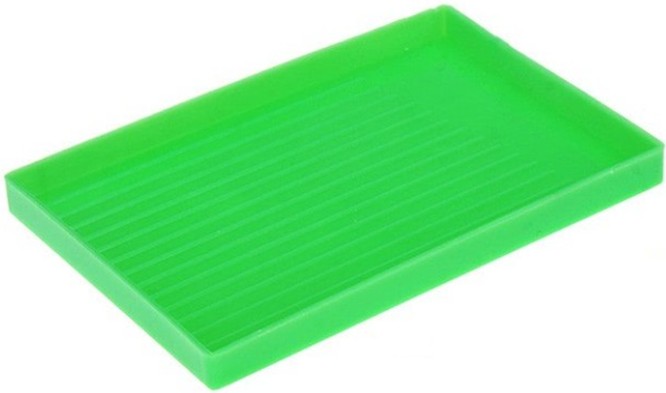
So that there shall be easy to work with the rhinestones, the kit comes with a small plastic tray to hold the rhinestones as you work.
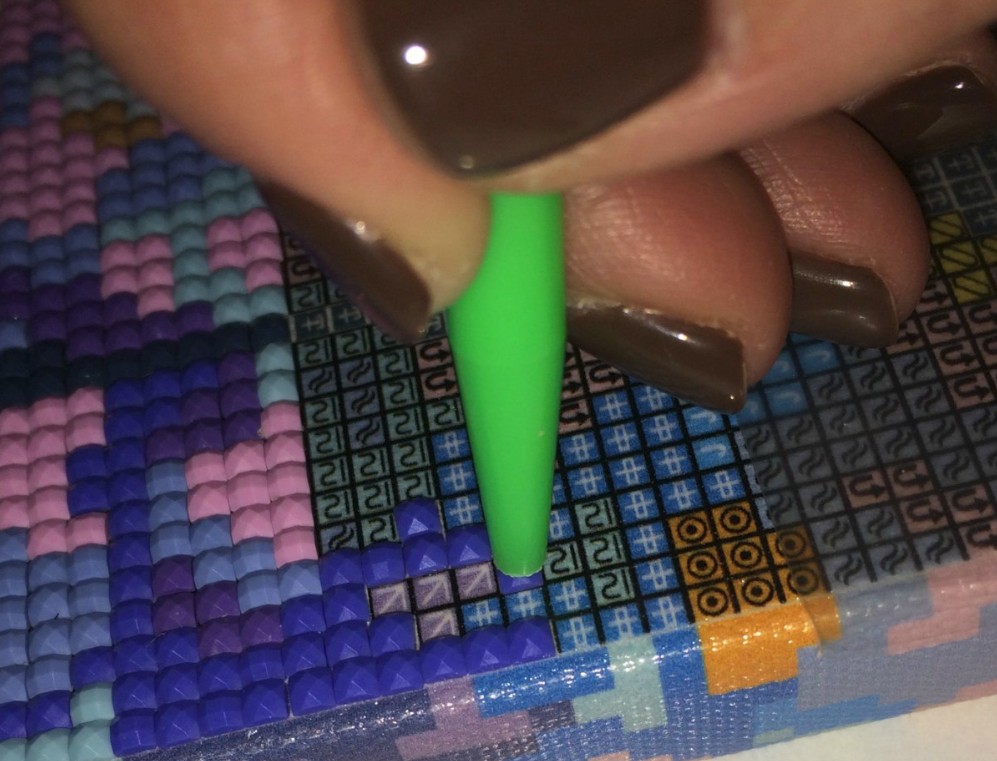
The rhinestones are positioned on the canvas with the help of a special stylus (pen) as per the chart in the kit.
Elements stuck agley or wrongfully may be corrected with the use of a pair of tweezers, which are also included in the toolkit supplied with the mosaic. If you were not able for any reason to stick the rhinestones prior to the canvas drying out or have noticed elements out of their places, don’t feel bad. A tub of glue is available in the kit, which will help to correct defects.
As can be seen from the above the diamond mosaic kit contains everything that is necessary for creating a bright three-dimensional design.
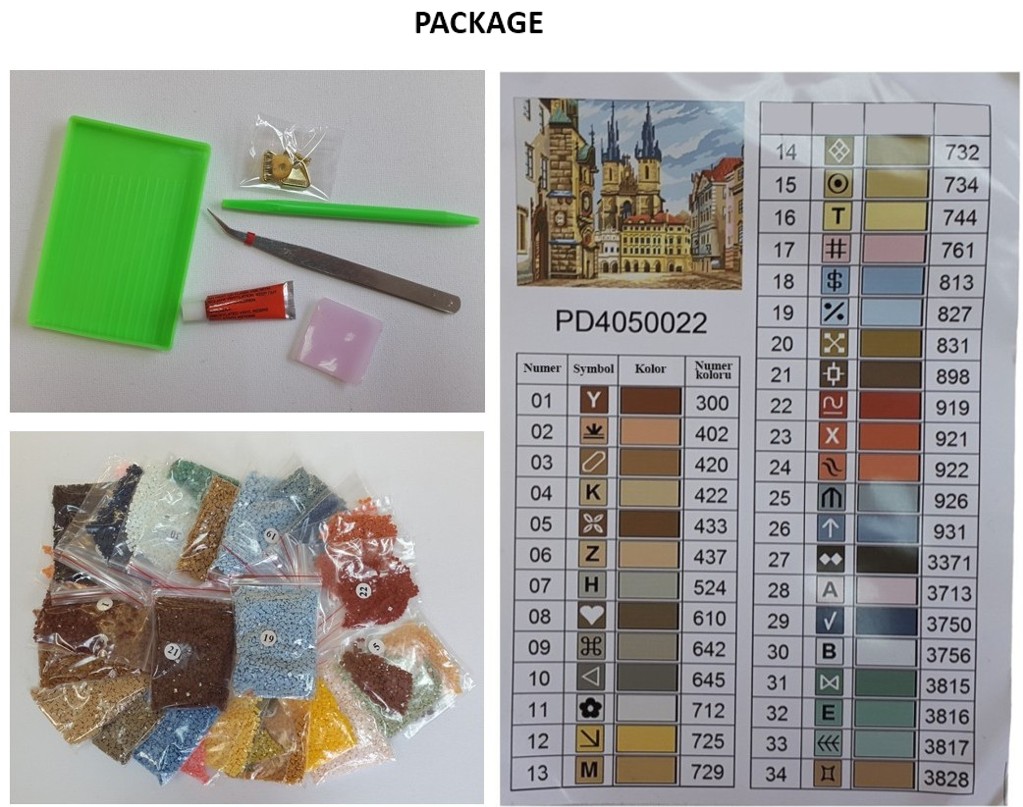
A kit consists of:
a canvas-chart with the legend. The canvas is coated with a special adhesive composition;
a firm wooden stretcher;
a protective film on the canvas preventing from glue drying out;
a kit of square rhinestones of different colors;
a pair of tweezers for ease of catching rhinestones;
a special pen (stylus), by means of which a rhinestone is transferred to the canvas;
a container for rhinestones;
wall fixing;
a gel-like glue for a stylus;
a glue;
a reference design.
We would like to draw your attention to some other issues:
Diamond mosaic laying out may be full or partial. The full laying out mosaic covers the whole fabric. In the partial laying out mosaic rhinestones cover only a part of the fabric. Of course, full laying out kits are more difficult, such work is more meticulous and takes more time. But the result is worth it – the designs turn out to be beautiful, bright and three-dimensional. The PICASSO diamond mosaic is presented only in full laying out version.
Rhinestones are of different forms, mainly square and round. Round rhinestones are usually included into cheaper kits. A design laid out with such rhinestones is inferior in appearance to designs created from square rhinestones, as, due to geometrical characteristics, it is impossible to position round rhinestones near each other in a gapless manner, which results in empty areas during the laying-out process, while square rhinestones perfectly adjoin each other. On the other hand, round rhinestones are often used in designs for definite themes with partial laying out, as that is the round form of rhinestones, which is suitable for this definite theme.
Moreover, the diamond mosaic differs in style: the canvas in the kit can be on the stretcher or without it (tubularly twisted). Kits without a stretcher are much cheaper, less easy-to-use, and on completing the design you need to glue the fabric on a sheet of skillet and find a stretcher for it, which is not very convenient. Moreover, such twisted canvases often have creases and bends, which considerably makes the work more difficult, as rhinestones are stuck on such areas badly, that’s why you need to stick each rhinestone separately, which is time-consuming and challenging.All the PICASSO kits are completed with the stretcher preformed. Such a set while finished may be hung on the wall without framing.
Are you already ready to proceed with the design? Excellent, then our further tips will help you.
Instruction for use
So, how to create the diamond embroidery designs?
Indeed, it is very simple: unpack a kit and put a design on a table; remove a protective layer; choose a colour to work with and pour it into a special tray; transfer rhinestones one by one with the use of a special pen to a designated place. That’s all!
And if to describe in more detail:
1) Prepare a working place. Unpack a kit, verify the availability of tools and the correspondence of rhinestones to the picture on the canvas;
2) The canvas is coated with a special adhesive layer and protected with a transparent film. Peel back carefully a piece of a protective film for the canvas surface to become sticky;
3) Find on an area of the canvas opened the symbols and rhinestone numbers corresponding to them.
Open packages with these rhinestones and pour them into a plastic container; rhinestones in a container shall be positioned flat side down. So that the rhinestones would turn over after pouring into a container, shake it gently or knock with a finger at the bottom. After that rhinestones will turn over, not all, but the majority.

4) Take a plastic pen and dip it into a gel-like glue (glue pad). After that some quantity of glue will remain on the pen tip, which glue will enable you to pick up the rhinestone.
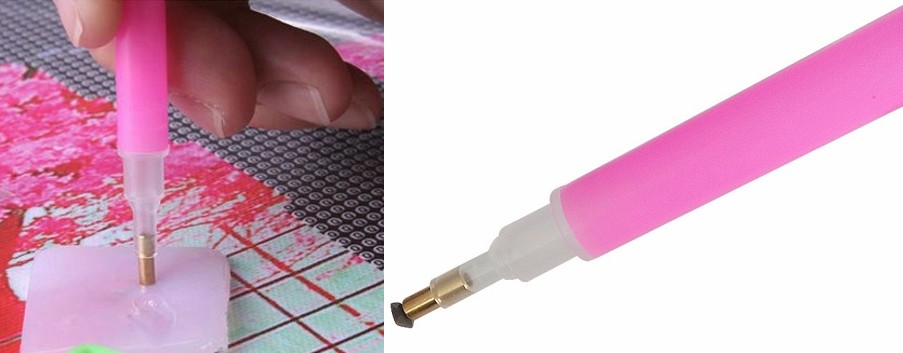
Then, touch the upper side of a rhinestone with the pen tip and the rhinestone will be glued to the pen. Usually, such quantity of glue is enough to transfer a lot of rhinestones. When rhinestones become to be glued to the pen worse, repeat the manipulation with the glue again;
5) Transfer a rhinestone to the canvas surface in accordance with its number to a designated place. Please, pay attention: the rhinestones are transferred to the canvas with the help of a stylus (pen). Some use a pair of tweezers for this purpose, but it is much less convenient. By means of a pen the process proceeds at a greater pace;
6) If you apply a rhinestone to a wrong place, you can withdraw it using a pair of tweezers.
7) If, in the process of laying out, you have forgotten to coat the canvas with a protective film and an adhesive base has dried out, you can grease it carefully with a liquid glue in the kit. You need to grease a small area you are working with right now, as the glue dries out quickly.
As you see, the process is rather simple, though time-consuming.
Tips and tricks
1) Do not remove all the protective film from the canvas at once. It is enough to uncover a small area, which you will be able to lay out at a time, and work with it. On completing this area you can remove (cut) a protective film, which has coated it, and uncover a new area for laying out. If you remove the whole film at once, the adhesive base can dry out quickly, it will gather dust and lose its stickiness.
2) Align rhinestones laid out. During rhinestone laying out, in case of gapping, small gaps can remain between them; also small distortions can appear as a result of unevenly glued rhinestones.
In order to make these gaps smaller and add a pretty look to the design, immediately after completing a certain area, until rhinestones are glued tightly, you can bring them closer to each other using a pair of tweezers in the kit, a rule or other straight object (a plastic card, for example): press gently with a straight object on each side of a segment chosen (vertically and horizontally). After that press rhinestones gently from above for them to be glued to the canvas better. It is recommended to do it through a protective film in order not to scratch rhinestones.

3) If you have glued a rhinestone to a wrong place, you can withdraw it from the canvas using a pair of tweezers in the kit.
4) Due to the fact that you are not recommended to unglue the whole protective film from the canvas prior to completing works, we recommend to choose an initial area on the canvas and move gradually to an opposite area, for example: bottom-up, right-to-left, from the upper left corner to the lower right corner, etc. You can choose any small segment and start filling it. Experiment and choose that variant, which is more suitable for you.
5) Upon completion, the design may be framed – this will add a finished appearance to the design and it will match perfectly your interior.
6) Pay attention to the quality of rhinestones. Sometimes you can find in the kit faulty rhinestones with any defect: a chip, a split, a hole, etc. But it is not a problem, as there is more than enough of rhinestones of each color in the kit. You need only to lay aside a faulty rhinestone and replace it with another one.
You can buy the diamond mosaic in UK in IPICASSO.CO.UK online shop. Here you will find different themes, a wide choice and reasonable prices. We choose carefully the designs and develop some of them ourselves. There are only clear-cut and easy-to-understand symbols of high resolution; bright and high-quality rhinestones in all kits.
In IPICASSO.CO.UK online store, you will find only full and finished kits: we do not sell twisted canvases, designs without stretchers, incomplete kits, kits without packing, etc.
Purchase high-quality goods from professionals, create your masterpieces and enjoy the process. We wish you enjoyable laying out and an excellent result!
 No customer reviews yet


